1、开启机器,本次实例分配的ip是:192.168.3.197(Xshell ssh连接)

2、安装unzip 工具、vim编辑器(个人习惯,vi也可以)

3、在/etc/hosts文件中添加本机IP跟主机名

4、关闭selinux ,编辑 /etc/selinux/config文件,设置SELINUX= enforcing 为SELINUX=disabled

5、关闭防火墙
(1)查看防火墙状态:systemctl status firewalld
(2)停止防火墙:systemctl stop firewalld
(3)关闭自启动防火墙服务:systemctl disable firewalld

6、安装Oracle 11g依赖包
[root@woitumi-197 ~]# yum -y install gcc make binutils gcc-c++ compat-libstdc++-33 elfutils-libelf-devel elfutils-libelf-devel-static elfutils-libelf-devel ksh libaio libaio-devel numactl-devel sysstat unixODBC unixODBC-devel pcre-devel

7、添加oinstall 、dba 组,新建oracle用户并加入oinstall、dba组中;
设置oracle用户登录密码;
查看Oracle用户信息


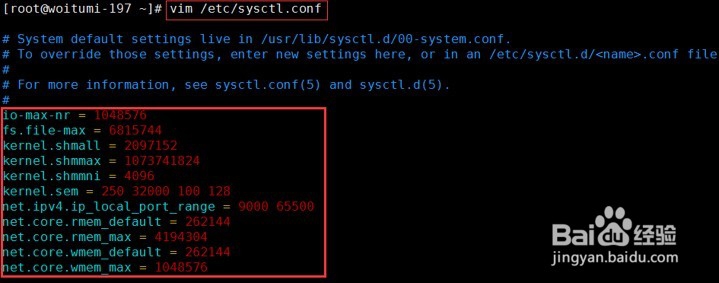
8、修改内核参数:编辑 /etc/sysctl.conf
添加以下设置:
io-max-nr = 1048576
fs.file-max = 6815744
kernel.shmall = 2097152
kernel.shmmax = 1073741824
kernel.shmmni = 4096
kernel.sem = 250 32000 100 128
net.ipv4.ip_local_port_range = 9000 65500
net.core.rmem_default = 262144
net.core.rmem_max = 4194304
net.core.wmem_default = 262144
net.core.wmem_max = 1048576
让参数生效:sysctl –p

9、修改用户的限制文件,编辑 /etc/security/limits.conf
添加以下配置:
oracle soft nproc 2047
oracle hard nproc 16384
oracle soft nofile 1024
oracle hard nofile 65536
oracle soft stack 10240

10、修改/etc/pam.d/login文件,添加:
session required /lib64/security/pam_limits.so
session required pam_limits.so

11、修改/etc/profile文件:
[root@woitumi-197 ~]# vim /etc/profile
添加:
if [ $USER = "oracle" ]; then
if [ $SHELL = "/bin/ksh" ]; then
ulimit -p 16384
ulimit -n 65536
else
ulimit -u 16384 -n 65536
fi
fi

12、创建安装目录、修改文件权限
[root@woitumi-197 ~]# mkdir -p /u01/app/oracle/product/11.2.0
[root@woitumi-197 ~]# mkdir /u01/app/oracle/oradata
[root@woitumi-197 ~]# mkdir /u01/app/oracle/inventory
[root@woitumi-197 ~]# mkdir /u01/app/oracle/fast_recovery_area
[root@woitumi-197 ~]# chown -R oracle:oinstall /u01/app/oracle
[root@woitumi-197 ~]# chmod -R 775 /u01/app/oracle

13、上传oracle软件包到 /tmp目录下(xftp上传)

14、解压oracle软件包:
[root@woitumi-197 tmp]# unzip linux.x64_11gR2_database_1of2.zip && unzip linux.x64_11gR2_database_2of2.zip

15、切换到oracle用户,设置oracle用户环境变量
[root@woitumi-197 database]# su - oracle
[oracle@woitumi-197 ~]$ vim .bash_profile
添加:
ORACLE_BASE=/u01/app/oracle
ORACLE_HOME=$ORACLE_BASE/product/11.2.0
ORACLE_SID=orcl
PATH=$PATH:$ORACLE_HOME/bin
export ORACLE_BASE ORACLE_HOME ORACLE_SID PATH

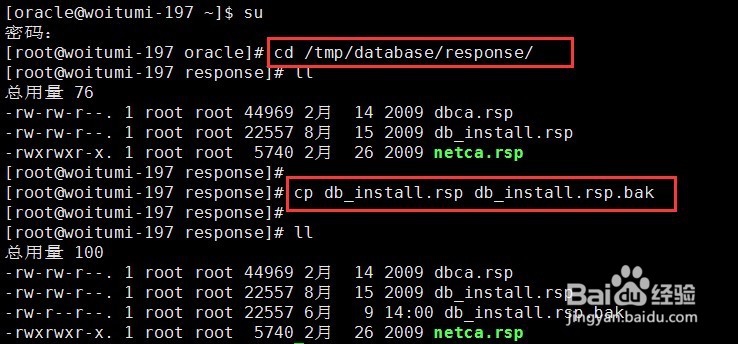
16、编辑静默安装响应文件
(1)切换到root 用户进入oracle安装包解压后的目录 /tmp/database/response/下备份db_install.rsp文件。
(2)编辑 /tmp/database/response/db_install.rsp文件
[root@woitumi-197 response]# vim db_install.rsp
修改以下参数:
oracle.install.option=INSTALL_DB_SWONLY
ORACLE_HOSTNAME=woitumi-197
UNIX_GROUP_NAME=oinstall
INVENTORY_LOCATION=/u01/app/oracle/inventory
SELECTED_LANGUAGES=en,zh_CN
ORACLE_HOME=/u01/app/oracle/product/11.2.0
ORACLE_BASE=/u01/app/oracle
oracle.install.db.InstallEdition=EE
oracle.install.db.DBA_GROUP=dba
oracle.install.db.OPER_GROUP=dba
DECLINE_SECURITY_UPDATES=true
17、根据响应文件安装oracle 11g
[oracle@woitumi-197 database]$ ./runInstaller -silent -ignorePrereq -ignoreSysPrereqs -responseFile /tmp/database/response/db_install.rsp

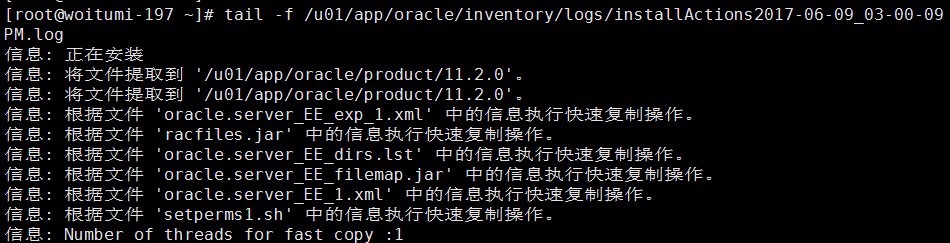
18、开始Oracle在后台静默安装。安装过程中,如果提示[WARNING]不必理会,此时安装程序仍在后台进行,如果出现[FATAL],则安装程序已经停止了。
出现以上界面,说明安装程序已在后台运行,此时再打开另外一个终端选项卡,输入提示的会话日志目录:
[root@woitumi-197 ~]# tail –f /u01/app/oracle/inventory/logs/installActions2017-06-09_03-00-09PM.log
看到日志文件会持续输出安装信息没有输入异常信息,则表明安装过程正常。
19、待看到下图红色框部分,则表明安装已经完成

20、按照提示切换root用户运行脚本
[oracle@woitumi-197 database]$ su
[root@woitumi-197 database]# sh /u01/app/oracle/inventory/orainstRoot.sh
[root@woitumi-197 database]# sh /u01/app/oracle/product/11.2.0/root.sh

21、用oracle用户登录配置监听
[oracle@woitumi-197 ~]$ netca -silent -responseFile /tmp/database/response/netca.rsp

22、出现下图情况时,则需要配置DISPLAY变量,配完之后重新netca:
[oracle@woitumi-197 ~]$ export DISPLAY=localhost:0.0


23、成功运行后,会在/u01/app/oracle/product/11.2.0/network/admin/ 中生成listener.ora和sqlnet.ora两个文件。
查看监听端口:
[root@woitumi-197 admin]# netstat -tnulp | grep 1521


24、建立新库,同时建立对应的实例
切换到root用户,编辑 /tmp/database/response/dbca.rsp
修改以下参数:
GDBNAME = "orcl"
SID = "orcl"
SYSPASSWORD = "oracle"
SYSTEMPASSWORD = "oracle"
SYSMANPASSWORD = "oracle"
DBSNMPPASSWORD = "oracle"
DATAFILEDESTINATION =/u01/app/oracle/oradata
RECOVERYAREADESTINATION=/u01/app/oracle/fast_recovery_area
CHARACTERSET = "ZHS16GBK"
TOTALMEMORY = "1638"
25、进行静默配置
root@woitumi-197 oracle]# su - oracle
[oracle@woitumi-197 ~]$ dbca -silent -responseFile /tmp/database/response/dbca.rsp

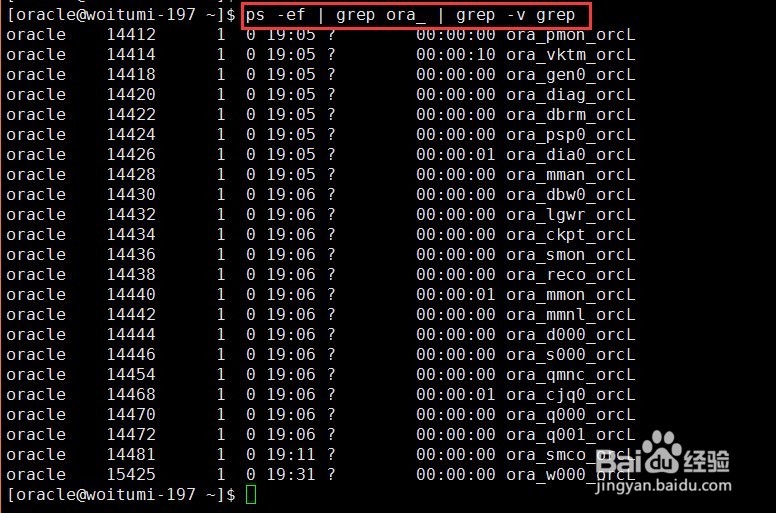
26、完成建库后进行实例检查
[oracle@woitumi-197 ~]$ ps -ef | grep ora_ | grep -v grep
27、查看监听状态
[oracle@woitumi-197 ~]$ lsnrctl status

28、登录查看实例状态
[oracle@woitumi-197 dbs]$ sqlplus / as sysdba
启动数据库:SQL> startup
看到以下信息,,表明数据库实例已经启动成功,至此,oracle 11g静默安装完成结束。

29、如果SQL> startup之后报LRM-00109错
则需要cd /u01/app/oracle/admin/orcl/pfile到目录下,把init.ora.59201719540文件cp到/u01/app/oracle/product/11.2.0/dbs/initorcl.ora
解决方法参考:http://yesican.blog.51cto.com/700694/471052

30、若遇到SQL> startup之后报LRM-01102错
可以尝试重启机器得到解决,重启后还是一样则可以参考:
http://blog.csdn.net/lzwgood/article/details/26368323
或者借助搜索引擎搜索。